A burst supply line can turn a dry room into a structural emergency within minutes. Standing water spreads beneath flooring, saturates drywall and insulation, and may migrate into wall cavities or lower levels before the source is obvious.
A qualified Water Extraction Company evaluates more than visible puddles. It identifies the water source, contamination category, affected materials, and drying conditions so removal does not end prematurely.
In Denver, rapid response matters during freeze-thaw cycles, intense summer storms, and basement seepage events. Restoration Logistics – Denver can be part of a property owner’s comparison process, but the central question is whether the response includes documented extraction, drying, cleaning, and appropriate repairs.
When Water Extraction Requires Immediate Action
Water damage typically begins with one of several emergencies:
-
Burst or frozen pipes and failed water heaters.
-
Dishwasher, washing-machine, refrigerator, or toilet leaks.
-
Basement flooding from sump-pump failure, foundation seepage, or stormwater.
-
Roof or window intrusion after severe weather.
-
Sewage backups or overflowing floor drains.
Standing water increases material absorption and can weaken wood, swell engineered flooring, stain finishes, and damage electrical systems. Hidden moisture behind baseboards, under carpet padding, inside insulation, or beneath floating floors can support microbial growth and produce persistent odors.
First, stop the water source if it is safe. Shut off the main valve for plumbing failures, but do not enter water near outlets, appliances, or electrical panels. Leave electrical isolation to qualified personnel when flooding is extensive. Keep children and pets away from contaminated water, and move undamaged valuables to a dry area without walking through unsafe conditions.
Avoid household vacuums unless they are specifically rated for wet extraction and the electrical environment is safe. Standard vacuums can create shock hazards and are not designed for substantial volumes. Sewage, floodwater, and water of uncertain origin should not be handled without appropriate personal protective equipment and containment.
What a Professional Water Extraction Visit Includes
A proper visit begins with an inspection and source assessment. Technicians document affected rooms, flooring types, wall assemblies, contents, and the apparent duration of exposure. Moisture mapping may include readings from drywall, framing, subflooring, cabinetry, and adjacent rooms that appear unaffected.
Typical equipment includes:
-
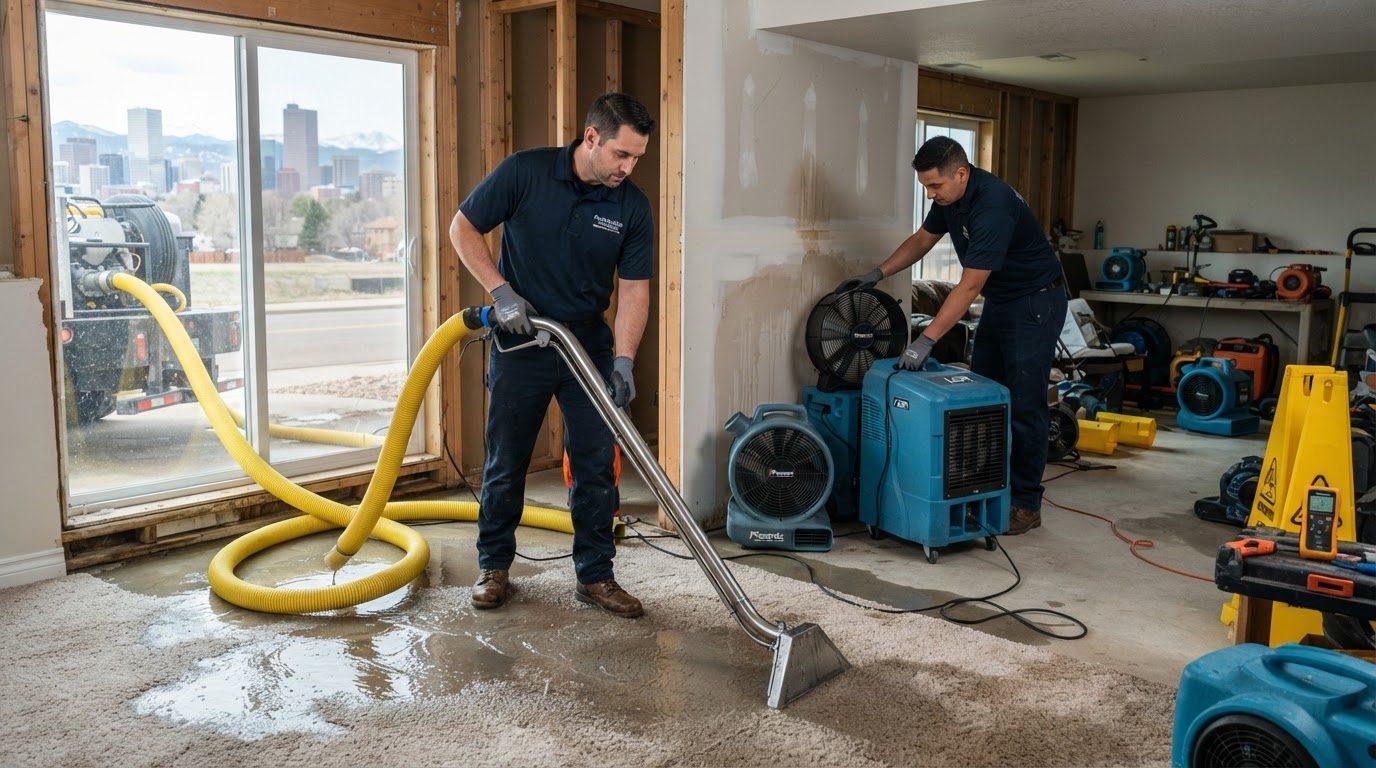
Submersible pumps and truck-mounted or portable extraction vacuums for bulk removal.
-
Pin and pinless moisture meters to compare wet materials with unaffected areas.
-
Infrared cameras to identify temperature patterns associated with hidden moisture, followed by meter verification.
-
Air movers and dehumidifiers sized for the affected volume.
Technicians then decide whether materials can be dried in place or must be removed. Carpet may be salvageable after clean-water exposure, while saturated pad is often removed. Drywall may require controlled openings or removal where insulation, wall cavities, or contamination prevents reliable drying. Wood flooring, cabinetry, and framing need careful monitoring because aggressive drying can cause additional warping or cracking.
Water classification is essential:
-
Category 1, or clean water: Supply-line leaks and some appliance failures, provided the water has not remained stagnant or contacted contaminants.
-
Category 2, or gray water: Water containing elevated biological or chemical contamination, such as discharge from a washing machine or toilet with no feces.
-
Category 3, or black water: Sewage, rising floodwater, or heavily contaminated water requiring specialized containment, removal, and disinfection.
Classification can change over time. A clean-water loss left untreated may become more hazardous as bacteria multiply and materials deteriorate.
The Drying and Restoration Process After Water Removal
Structural Drying and Moisture Monitoring
Extraction removes free water; it does not necessarily dry a building. Moisture can remain behind walls, beneath flooring, inside framing, and within insulation. Commercial air movers increase evaporation from surfaces, while dehumidifiers remove vapor from the air. Ventilation is used selectively because bringing humid outdoor air indoors can slow drying.
A competent crew establishes baseline readings, places equipment according to airflow and material conditions, and returns for documented monitoring. Readings are compared with unaffected materials or accepted drying targets. Equipment may be adjusted, relocated, or removed only when the data supports that decision.
This documentation is valuable for owners, property managers, and insurers. It shows what was wet, what intervention occurred, and whether the structure reached an appropriate dry condition rather than relying on touch or appearance.
Cleaning, Sanitizing, and Odor Control
Cleaning follows extraction and may include removal of soil, detergent residue, and damaged materials. Depending on the category, technicians may use EPA-registered disinfectants, antimicrobial products, HEPA filtration, negative air, or controlled demolition. Product selection should match the surface and contamination—not simply mask an odor.
Sewage losses require containment and specialized disposal. Porous materials that cannot be effectively cleaned, such as certain insulation, carpet pad, or heavily contaminated drywall, may need removal. Drying contaminated materials in place without proper controls can spread pathogens and odor.
Repairs and Contents Handling
Furniture, documents, electronics, inventory, and personal items may require elevation, protective wrapping, on-site cleaning, or a documented pack-out. Contents handling should include photographs, inventory records, and a secure dry-storage plan.
Once drying is complete, mitigation transitions to reconstruction. Repairs may include drywall, insulation, flooring, trim, ceilings, paint, cabinetry, and electrical or plumbing work. Some companies coordinate these trades; others focus on mitigation and refer reconstruction. Either approach can work if repair decisions are based on final moisture results and clearly separated estimates.
Residential, Commercial, and Basement Water Extraction Needs
A home loss may involve a few rooms and household contents. An office, retail store, multifamily building, or industrial facility may involve inventory, elevators, shared mechanical systems, tenant access, and business-continuity requirements. Commercial response plans often include phased extraction, protected work zones, after-hours scheduling, inventory relocation, and regular communication with building management.
Basements present particular risks. Water may enter through foundation walls, floor drains, window wells, or failed sump pumps. Finished basement walls can conceal saturated insulation and framing, while electrical equipment and furnaces may be located near the floor. Do not enter a flooded basement until electrical and structural hazards have been assessed.
Large losses may require multiple crews, temporary storage, staged demolition, or coordination with plumbers, roofers, industrial hygienists, and adjusters. In multifamily properties, isolating the source and documenting damage by unit is as important as removing water quickly.
Cost, Insurance, and Choosing the Right Response Team
Water extraction pricing varies substantially. A small clean-water job may cost approximately $500 to $1,500, while a multi-room loss commonly ranges from $2,000 to $6,000 or more. Extensive basement flooding, sewage remediation, contents handling, demolition, and reconstruction can exceed $10,000. These are planning ranges, not quotes.
The main cost factors include:
-
Water volume and affected square footage.
-
Category of contamination and required protective measures.
-
Accessibility, flooring and wall construction, and equipment duration.
-
Contents manipulation, storage, demolition, cleaning, and reconstruction.
Homeowners insurance often covers sudden, accidental water damage, such as a burst pipe, subject to the policy deductible and limits. It commonly excludes gradual seepage, neglected maintenance, repeated leaks, groundwater intrusion, and unresolved plumbing defects. Flooding from outside may require separate flood insurance. Report the loss promptly, photograph conditions, prevent further damage when safe, and retain receipts.
When comparing a water extraction company, ask:
-
Do you provide an itemized estimate and moisture map?
-
What training, safety procedures, and industry standards guide the work?
-
Which meters, extraction systems, air movers, and dehumidifiers will be used?
-
How often will readings be documented?
-
Can you handle Category 3 water, contents pack-out, and odor control?
-
Do you coordinate with adjusters and provide reconstruction, or use separate trades?
-
What happens if hidden moisture is discovered after demolition?
Technicians should follow recognized restoration practices, use OSHA-appropriate safety procedures, and understand relevant IICRC standards. EPA guidance is also important when disinfectants, lead-containing materials, or potential mold conditions are involved. Certification alone does not guarantee quality, but transparent documentation and competent communication are strong indicators.
Frequently Asked Questions
How much does water extraction cost?
Small losses may begin around $500, while larger or contaminated projects can reach several thousand dollars. Equipment time, demolition, access, and repairs drive the final price.
Is water restoration covered by homeowners insurance?
Often, when the cause is sudden and accidental. Gradual leaks, maintenance issues, groundwater, and outside flooding are commonly excluded. Review the policy and contact the carrier promptly.
How quickly should professional drying begin?
Immediately—ideally the same day. Faster extraction reduces absorption, secondary damage, odor, and the likelihood that materials will require removal.
Is emergency availability important?
Yes, particularly for active leaks, sewage, flooded electrical areas, commercial losses, and basement water. Ask about after-hours dispatch, follow-up monitoring, and escalation procedures before an emergency occurs.